サンプルゲーム
本チュートリアルの集大成として、シンプルなゲームを作ってみましょう。
題材は単純なミニゲームで、前方から襲ってくる敵から宝箱を守るゲームです。 タップで主人公が移動し、主人公をタップすると攻撃します。 タイトルはたからもりとでもしておきましょう。
完成イメージは以下のようになります。
完成イメージ
タイトル画面
ゲームのタイトルとはじめるボタンがあるだけのシンプルな画面です。
タイトルは、SKLabelNodeを使って、もさもさフォント1で表示しています。
独自フォントの利用については、特にSprite Kit特有の設定は不要です。
Info.plistでFonts provided by applicationを設定すれば使えます。
うまく表示できない場合は、Copy Bundle Resourcesに入っているかチェックしてみましょう。
はじめるボタンは、ボタンらしく動作させるため、ハイライト状態によって色が変わるサブクラスを使っています。
touchesBegan:withEvent:でハイライトさせ、touchesEnded:withEventで画面繊維の処理を実行しています。
SKButtonNode.h
ハイライト状態を保持するプロパティを追加しています。
@interface SJButtonNode : SKLabelNode
@property (nonatomic) BOOL highlighted;
@end
SKButtonNode.m
ハイライト時は、グレーをブレンドして色を変えています。
- (id)initWithFontNamed:(NSString *)fontName {
    if (self = [super initWithFontNamed:fontName]) {
        self.color = [SKColor grayColor];
    }
    return self;
}

- (void)setHighlighted:(BOOL)highlighted {
    if (!self.hidden) {
        _highlighted = highlighted;
    }
    self.colorBlendFactor = _highlighted ? 0.7f : 0;
}
SJTitleScene.m
シーンの初期化時にラベルやボタンを追加しています。 ただ表示するではゲームっぽくないため、SKActionでタイトルを上にアニメーションさせています。
それが終わったらボタンが表示されます。タップに合わせてボタンのハイライトや画面遷移の処理を行なっています。
- (void)createSceneContents {
    SKLabelNode *titleLabel = [SKLabelNode labelNodeWithFontNamed:@"Mosamosa"];
    titleLabel.text = @"たからもり";
    titleLabel.position = CGPointMake(CGRectGetMidX(self.frame), CGRectGetMidY(self.frame));
    [self addChild:titleLabel];

    SJButtonNode *startButton = [SJButtonNode labelNodeWithFontNamed:titleLabel.fontName];
    startButton.text = @"はじめる";
    startButton.position = CGPointMake(CGRectGetMidX(self.frame), CGRectGetMidY(self.frame) - 30.0f);
    startButton.fontSize = 20.0f;
    startButton.hidden = YES;
    startButton.name = @"start";
    [self addChild:startButton];

    SKAction *wait = [SKAction waitForDuration:1.0f];
    SKAction *moveUp = [SKAction moveByX:0 y:50.0f duration:0.5f];
    SKAction *sequence = [SKAction sequence:@[wait, moveUp]];
    [titleLabel runAction:sequence completion:^{
        startButton.hidden = NO;
    }];
}

- (void)touchesBegan:(NSSet *)touches withEvent:(UIEvent *)event {
    UITouch *touch = [touches anyObject];
    SKNode *nodeAtPoint = [self nodeAtPoint:[touch locationInNode:self]];
    if (nodeAtPoint.name == START_NAME) {
        SJButtonNode *startButton = (SJButtonNode *)nodeAtPoint;
        startButton.highlighted = YES;
    }
}

- (void)touchesCancelled:(NSSet *)touches withEvent:(UIEvent *)event {
    SJButtonNode *startButton = (SJButtonNode *)[self childNodeWithName:START_NAME];
    startButton.highlighted = NO;
}

- (void)touchesEnded:(NSSet *)touches withEvent:(UIEvent *)event {
    UITouch *touch = [touches anyObject];
    SKNode *nodeAtPoint = [self nodeAtPoint:[touch locationInNode:self]];

    if (nodeAtPoint.name == START_NAME) {
        SJButtonNode *startButton = (SJButtonNode *)nodeAtPoint;
        if (startButton.highlighted) {
            SJPlayScene *playScene = [SJPlayScene sceneWithSize:self.size];
            SKTransition *transition = [SKTransition pushWithDirection:SKTransitionDirectionLeft duration:1.0f];
            [self.view presentScene:playScene transition:transition];
        }
    }

    [self touchesCancelled:touches withEvent:event];
}
今回は設定機能もないため、タイトル画面はこれで完成です。

タイトル画面
note
AppleのAdventureでは、SKViewにUIButton・NSButtonを追加して、本編プレイ中は非表示にするという方法でボタンが実装がされています。SKViewはUIViewのサブクラスなのでUIKitやAppKitと簡単に組み合わせられるのが良い所です。ただ、クロスプラットフォームにするためにはプラットフォームに応じたフレームワークを使用する必要があります。
ゲーム画面
それではメインのゲーム画面を作ります。実装ファイルはSJExampleScene.mです。
定数とインスタンス変数
ゲーム画面で使う定数や変数等を以下のように冒頭で定義しています。特別なものはありません。
変数については、createSceneContents内で初期化しています。
それぞれの使われ方については、この後のソースをご参照ください。
static inline CGFloat skRandf() {
    return rand() / (CGFloat) RAND_MAX;
}
static inline CGFloat skRand(CGFloat low, CGFloat high) {
    return skRandf() * (high - low) + low;
}

static NSString * const HERO_NAME = @"hero";
static NSString * const ENEMY_NAME = @"enemy";
static NSString * const TIME_NAME = @"time";
static NSString * const SCORE_NAME = @"score";

static const CGFloat TILE_SIZE = 96.0f;
static const CGFloat HERO_SPEED = 1.5f;
static const CGFloat ENEMY_SPEED = 100.0f;

static const uint32_t heroCategory = 0x1 << 0;
static const uint32_t enemyCategory = 0x1 << 1;
static const uint32_t boxCategory = 0x1 << 2;
static const uint32_t worldCategory = 0x1 << 3;

@implementation SJPlayScene {
    BOOL _contentCreated;
    NSTimeInterval _lastUpdateTimeInterval;
    NSTimeInterval _timeSinceStart;
    NSTimeInterval _timeSinceLastSecond;
    int _enemies;
    int _boxes;
    int _score;
}

- (void)createSceneContents {
    _lastUpdateTimeInterval = 0;
    _timeSinceStart = 0;
    _timeSinceLastSecond = 0;
    _enemies = 0;
    _score = 0;
}
表示
まずは、キャラクターや背景の描画です。 以下のように、それぞれ表示用のメソッドを用意して、呼び出しています。
- (void)createSceneContents {
    /* 省略 */

    [self _addBackground];
    [self _addHero];
    [self _addBoxes];
    [self _addLabels];

    /* 省略 */
}
背景
Sprite Kitには、タイルマップの機能がありません。
必須の場合は、Kobold Kit 等のサードパーティ製ツールを使うのがてっとり早いでしょう。
ここではwood.pngを並べるだけの簡易的な実装にしています。なお、メモリ節約のため、SKTextureは再利用しています。

wood.png
- (void)_addBackground {
    SKTexture *wood = [SKTexture textureWithImageNamed:@"wood"];

    int rows = self.frame.size.height / TILE_SIZE;
    int cols = self.frame.size.width / TILE_SIZE;
    for (int row = 0; row <= rows; row++) {
        int y = row * TILE_SIZE;
        for (int col = 0; col <= cols; col++) {
            int x = col * TILE_SIZE;
            SKSpriteNode *bgSprite = [SKSpriteNode spriteNodeWithTexture:wood];
            bgSprite.anchorPoint = CGPointMake(0, 0);
            bgSprite.position = CGPointMake(x, y);
            bgSprito.xScale = TILE_SIZE / wood.size.width;
            bgSprite.yScale = TILE_SIZE / wood.size.height;
            [self addChild:bgSprite];
        }
    }
}
主人公
静止・歩行・攻撃と状態に応じてアニメーションの種類が変わるため、SJHeroNodeクラスにまとめています。
SJPlaySceneではそのインスタンスを子ノードとして追加するだけです。
- (void)_addHero {
    SJHeroNode *hero = [SJHeroNode hero];
    hero.position = CGPointMake(CGRectGetMidX(self.frame), hero.size.height * 1.25f);
    hero.name = HERO_NAME;
    hero.zPosition = 1.0f;
    [self addChild:hero];
}
SJHeroNode.h
状態の一覧と現在の状態を保持するプロパティ、状態を変化させるメソッドを追加しています。
extern const CGFloat TIP_SIZE;

typedef enum : uint8_t {
    SJHeroStateStop = 0,
    SJHeroStateWalk,
    SJHeroStateAttack
} SJHeroState;

@interface SJHeroNode : SKSpriteNode

@property (nonatomic) SJHeroState state;

+ (id)hero;

- (void)stop;
- (void)walk;
- (void)attack;

@end
SJHeroNode.m
少し長いですが、状態に応じて画像を切り替えて、アニメーションさせているだけです。
SKActionのanimateWithTextures:timePerFrame:を使ってパラパラ漫画風の動きを実現しています。
攻撃状態の時だけ、剣も表示しています。アニメーションのさせ方はキャラクターと同じです。
const CGFloat TIP_SIZE = 96.0f;

@implementation SJHeroNode

+ (id)hero {
    SJHeroNode *hero = [SJHeroNode spriteNodeWithTexture:nil size:CGSizeMake(TIP_SIZE, TIP_SIZE)];
    return hero;
}

- (id)initWithTexture:(SKTexture *)texture color:(UIColor *)color size:(CGSize)size {
    if (self = [super initWithTexture:texture color:color size:size]) {
        [self stop];
    }
    return self;
}

- (void)stop {
    [self _animate:@"clotharmor" withRow:3 cols:2 time:0.6f completion:nil];
    self.state = SJHeroStateStop;
}

- (void)walk {
    [self _animate:@"clotharmor" withRow:4 cols:4 time:0.2f completion:nil];
    self.state = SJHeroStateWalk;
}

- (void)attack {

    [self _animate:@"clotharmor" withRow:5 cols:5 time:0.05f completion:^{
        self.state = SJHeroStateStop;
    }];
    [self _sword];

    self.state = SJHeroStateAttack;
}

- (void)_sword {
    NSArray *textures = [self _textures:@"sword1" withRow:5 cols:5];

    SKSpriteNode *swordSprite = [SKSpriteNode spriteNodeWithTexture:textures.firstObject];
    [self addChild:swordSprite];

    SKAction *animate = [SKAction animateWithTextures:textures timePerFrame:0.05f];
    SKAction *remove = [SKAction removeFromParent];
    SKAction *sequence = [SKAction sequence:@[animate, remove]];
    [swordSprite runAction:sequence];
}

- (void)_animate:(NSString *)name withRow:(int)row cols:(int)cols time:(CGFloat)time completion:(void (^)())block {

    NSArray *textures = [self _textures:name withRow:row cols:cols];

    SKAction *animate = [SKAction animateWithTextures:textures timePerFrame:time];
    if (!block) {
        SKAction *forever = [SKAction repeatActionForever:animate];
        [self runAction:forever];
    } else {
        [self runAction:animate completion:block];
    }
}

- (NSArray *)_textures:(NSString *)name withRow:(int)row cols:(int)cols {
    SKTexture *texture = [SKTexture textureWithImageNamed:name];

    NSMutableArray *textures = @[].mutableCopy;
    for (int col = 0; col < cols; col++) {
        CGFloat x = col * TIP_SIZE / texture.size.width;
        CGFloat y = row * TIP_SIZE / texture.size.height;
        CGFloat w = TIP_SIZE / texture.size.width;
        CGFloat h = TIP_SIZE / texture.size.height;

        SKTexture *t = [SKTexture textureWithRect:CGRectMake(x, y, w, h) inTexture:texture];
        [textures addObject:t];
    }

    return textures;
}

@end
敵
敵は表示するだけで、状態も持たないため単純です。
メソッドが呼ばれるごとに、ランダムな座標にコウモリを表示しています。
アニメーションの方法はSJHeroNodeと同様です。
- (void)_addEnemy {

    _enemies++;

    int row = 0;
    int cols = 5;
    SKTexture *bat = [SKTexture textureWithImageNamed:@"bat"];

    NSMutableArray *textures = @[].mutableCopy;
    for (int col = 0; col < cols; col++) {
        CGFloat x = col * TIP_SIZE / bat.size.width;
        CGFloat y = row * TIP_SIZE / bat.size.height;
        CGFloat w = TIP_SIZE / bat.size.width;
        CGFloat h = TIP_SIZE / bat.size.height;

        SKTexture *texture = [SKTexture textureWithRect:CGRectMake(x, y, w, h) inTexture:bat];
        [textures addObject:texture];
    }

    SKSpriteNode *enemy = [SKSpriteNode spriteNodeWithTexture:textures.firstObject];
    enemy.position = CGPointMake(skRand(40.0f, CGRectGetMaxX(self.frame) - 40.0f), CGRectGetMaxY(self.frame) - TIP_SIZE);
    enemy.name = ENEMY_NAME;
    [self addChild:enemy];

    SKAction *animate = [SKAction animateWithTextures:textures timePerFrame:0.1f];
    SKAction *forever = [SKAction repeatActionForever:animate];
    [enemy runAction:forever];
}
宝箱
宝箱は画面いっぱいに横一列で並べています。
- (void)_addBoxes {
    SKTexture *chest = [SKTexture textureWithImageNamed:@"chest"];
    _boxes = 6;

    int y = 30.0f;
    for (int col = 0; col < _boxes; col++) {
        int x = col * chest.size.width + 40.0f;
        SKSpriteNode *boxSprite = [SKSpriteNode spriteNodeWithTexture:chest];
        boxSprite.position = CGPointMake(x, y);
        [self addChild:boxSprite];
    }
}
ラベル
時間とスコアを表示するラベルです。 ステータスバーと被らないように、少しずらしています。
- (void)_addLabels {
    SKLabelNode *timeLabel = [SKLabelNode labelNodeWithFontNamed:@"Mosamosa"];
    timeLabel.name = TIME_NAME;
    timeLabel.verticalAlignmentMode = SKLabelVerticalAlignmentModeTop;
    timeLabel.horizontalAlignmentMode = SKLabelHorizontalAlignmentModeLeft;
    timeLabel.position = CGPointMake(5.0f, CGRectGetMaxY(self.frame) - 20.0f);
    timeLabel.fontSize = 14.0f;
    [self addChild:timeLabel];

    SKLabelNode *scoreLabel = [SKLabelNode labelNodeWithFontNamed:@"Mosamosa"];
    scoreLabel.name = SCORE_NAME;
    scoreLabel.verticalAlignmentMode = SKLabelVerticalAlignmentModeTop;
    scoreLabel.horizontalAlignmentMode = SKLabelHorizontalAlignmentModeRight;
    scoreLabel.position = CGPointMake(CGRectGetMaxX(self.frame) - scoreLabel.frame.size.width - 5.0f, CGRectGetMaxY(self.frame) - 20.0f);
    scoreLabel.fontSize = 14.0f;
    [self addChild:scoreLabel];
    [self _score:0];
}
ここまでで表示処理は終わりです。 これらを、ユーザの操作・物理シミューレション・時間の経過等によって更新していくことで、ゲームになっていきます。
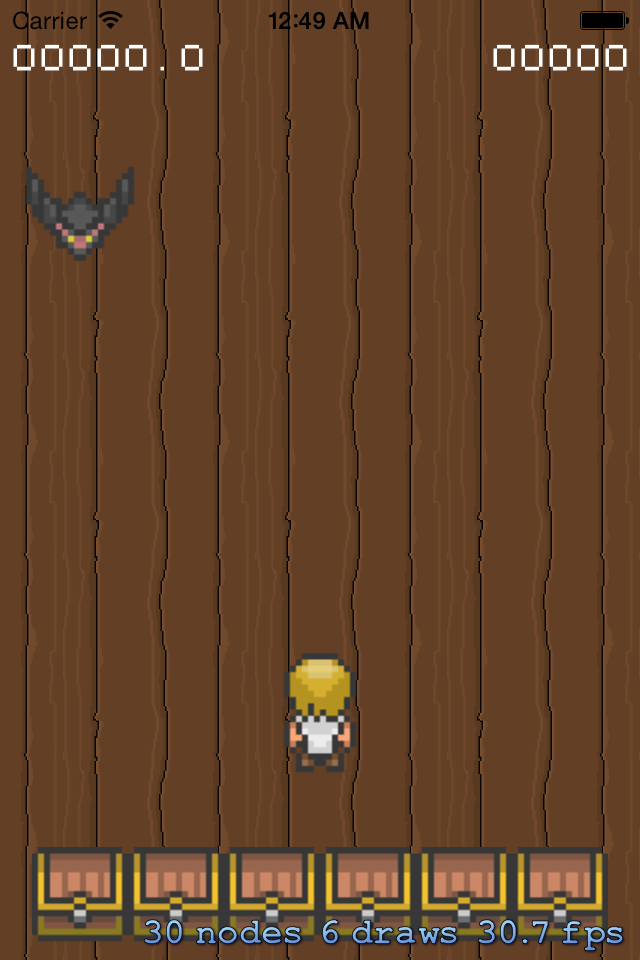
表示だけ
操作
本ゲームはタップのみで操作します。 タップされた位置に主人公がいたら攻撃します。2 そうでなければ、タップされた座標と今いる座標の差分を取り、一定速度になるよう移動させます。
- (void)touchesBegan:(NSSet *)touches withEvent:(UIEvent *)event {
    UITouch *touch = [touches anyObject];
    CGPoint locaiton = [touch locationInNode:self];
    SKNode *nodeAtPoint = [self nodeAtPoint:locaiton];
    if (nodeAtPoint.name == HERO_NAME) {
        SJHeroNode *hero = (SJHeroNode *)nodeAtPoint;
        [hero attack];
        for (SKNode *node in [self nodesAtPoint:locaiton]) {
            if (node.name == ENEMY_NAME) {
                [self _attack:node];
            }
        }
    } else {
        SJHeroNode *hero = (SJHeroNode *)[self childNodeWithName:HERO_NAME];
        CGFloat x = locaiton.x;
        CGFloat diff = abs(hero.position.x - x);
        CGFloat duration = HERO_SPEED * diff / self.frame.size.width;
        SKAction *move = [SKAction moveToX:x duration:duration];
        [hero removeAllActions];
        [hero walk];
        [hero runAction:move completion:^{
            [hero stop];
        }];
    }
}

- (void)_attack:(SKNode *)enemy {
    NSString *sparkPath = [[NSBundle mainBundle] pathForResource:@"spark" ofType:@"sks"];
    SKEmitterNode *spark = [NSKeyedUnarchiver unarchiveObjectWithFile:sparkPath];
    spark.position = enemy.position;
    spark.xScale = spark.yScale = 0.2f;
    [self addChild:spark];

    SKAction *fadeOut = [SKAction fadeOutWithDuration:0.3f];
    SKAction *remove = [SKAction removeFromParent];
    SKAction *sequence = [SKAction sequence:@[fadeOut, remove]];
    [spark runAction:sequence];

    [enemy removeFromParent];
    _enemies--;

    [self _score:1 * _timeSinceStart];
}

- (void)_miss:(SKNode *)box {

    NSString *firePath = [[NSBundle mainBundle] pathForResource:@"fire" ofType:@"sks"];
    SKEmitterNode *fire = [NSKeyedUnarchiver unarchiveObjectWithFile:firePath];
    fire.position = box.position;
    fire.xScale = fire.yScale = 0.7f;
    [self addChild:fire];

    SKAction *fadeOut = [SKAction fadeOutWithDuration:3.0f];
    SKAction *remove = [SKAction removeFromParent];
    SKAction *sequence = [SKAction sequence:@[fadeOut, remove]];
    [fire runAction:sequence];

    [box removeFromParent];
    _boxes--;

    if (_boxes < 1) {
        SJGameOverScene *goScene = [SJGameOverScene sceneWithSize:self.size];
        SKTransition *transition = [SKTransition fadeWithDuration:3.0f];
        [self.view presentScene:goScene transition:transition];
    }
}

- (void)_score:(int)score {
    _score += score;
    SKLabelNode *scoreLabel = (SKLabelNode *)[self childNodeWithName:SCORE_NAME];
    scoreLabel.text = [NSString stringWithFormat:@"%05d", _score];
}
更新
今回は、時間の経過に応じてフレーム毎に処理を行ないため、update:をオーバーライドしています。
_timeSinceStartにはゲーム開始からの合計時間を保持し、_timeLabelに表示しています。
_timeSinceSecondには前回の秒からの時間を保持し、1秒以上経過したら、敵を表示させたり、単位度を上げる判定をしたりする処理を実行しています。
- (void)update:(NSTimeInterval)currentTime {

    if (_lastUpdateTimeInterval > 0) {
        CFTimeInterval timeSinceLast = currentTime - _lastUpdateTimeInterval;
        _timeSinceStart += timeSinceLast;
        _timeSinceLastSecond += timeSinceLast;

        SKLabelNode *timeLabel = (SKLabelNode *)[self childNodeWithName:TIME_NAME];
        timeLabel.text = [NSString stringWithFormat:@"%07.1f", _timeSinceStart];

        if (_timeSinceLastSecond >= 1) {
            _timeSinceLastSecond = 0;

            int timing = 3;
            if (_timeSinceStart > 2) timing = 2;
            if (_timeSinceStart > 4) timing = 1;

            int max = 1;
            if (_timeSinceStart > 1) max = 2;
            if (_timeSinceStart > 3) max = 3;
            if (_timeSinceStart > 5) max = 4;
            if ((int)_timeSinceStart % timing == 0) {
                if (_enemies < max) {
                    [self _addEnemy];
                }
            }
        }

    }
    _lastUpdateTimeInterval = currentTime;

}
物理シミュレーション
ゲーム画面最後の処理は、物理演算です。 これによって、登場人物同士が干渉しあうようになり、ゲームが成立します。
まず、画面の周囲をかこうようにbodyを設定します。
また、当たり判定を行なうため、contactDelegateを自分自身で受けるようにします。
categoryBitMaskにはworldCategoryを設定していますが、これは敵が枠と接触したことを判定するためです。
@interface SJPlayScene () <SKPhysicsContactDelegate>
@end
- (void)createSceneContents {
/* 省略 */
self.physicsBody = [SKPhysicsBody bodyWithEdgeLoopFromRect:self.frame];
self.physicsWorld.contactDelegate = self;
self.physicsBody.categoryBitMask = worldCategory;
}主人公
主人公は他の物体と衝突(collision)はせず、敵とのみ接触(contact)します。
- (void)_addHero {

    /* 省略 */

    hero.physicsBody = [SKPhysicsBody bodyWithRectangleOfSize:CGSizeMake(TIP_SIZE * 0.5f, TIP_SIZE * 0.5f)];
    hero.physicsBody.affectedByGravity = NO;
    hero.physicsBody.categoryBitMask = heroCategory;
    hero.physicsBody.contactTestBitMask = enemyCategory;
    hero.physicsBody.collisionBitMask = 0;
}
敵
敵は宝箱と枠と接触します。衝突はしません。
重力を無視し、velocityを設定することで上から下へ移動させています。
サイズは小さくないですが、ゲーム後半になると速く動くようになるため、usesPreciseCollisionDetectionをYESにしています。
- (void)_addEnemy {

    /* 省略 */

    enemy.physicsBody = [SKPhysicsBody bodyWithRectangleOfSize:CGSizeMake(TIP_SIZE * 0.4f, TIP_SIZE * 0.4f)];
    enemy.physicsBody.affectedByGravity = NO;
    enemy.physicsBody.velocity = CGVectorMake(0, -ENEMY_SPEED - _timeSinceStart * 3);
    enemy.physicsBody.categoryBitMask = enemyCategory;
    enemy.physicsBody.contactTestBitMask = boxCategory | worldCategory;
    enemy.physicsBody.collisionBitMask = 0;
    enemy.physicsBody.usesPreciseCollisionDetection = YES;

}
宝箱
宝箱も衝突しないように設定します。
- (void)_addBoxes {

    /* 省略 */

        boxSprite.physicsBody = [SKPhysicsBody bodyWithRectangleOfSize:CGSizeMake(boxSprite.size.width * 0.5f, boxSprite.size.height * 0.5f)];
        boxSprite.physicsBody.affectedByGravity = NO;
        boxSprite.physicsBody.categoryBitMask = boxCategory;
        boxSprite.physicsBody.collisionBitMask = 0;
    }
}
contactDelegate
物体間の接触時によばれるDelegateメソッドです。
主人公が攻撃中だったら、sparkのパーティクルを表示させると共に接触した敵を消滅させます。 敵は宝箱か枠と接触しても消滅します。 宝箱と接触した場合は、fireのパーティクルを表示させ、宝箱を消します。
敵を倒すとスコアがプラスになり、宝箱が0になるとゲームオーバーです。
# pragma mark - SKPhysicsContactDelegate

- (void)didBeginContact:(SKPhysicsContact *)contact {
    SKPhysicsBody *firstBody, *secondBody;

    if (contact.bodyA.categoryBitMask < contact.bodyB.categoryBitMask) {
        firstBody = contact.bodyA;
        secondBody = contact.bodyB;
    } else {
        firstBody = contact.bodyB;
        secondBody = contact.bodyA;
    }

    if ((firstBody.categoryBitMask & heroCategory) != 0) {
        if ((secondBody.categoryBitMask & enemyCategory) != 0) {
            SJHeroNode *hero = (SJHeroNode *)firstBody.node;
            if (hero.state == SJHeroStateAttack) {
                [self _attack:secondBody.node];
            }
        }
    } else if ((firstBody.categoryBitMask & enemyCategory) != 0) {
        if ((secondBody.categoryBitMask & worldCategory) != 0) {
            [firstBody.node removeFromParent];
            _enemies--;
        } else if ((secondBody.categoryBitMask & boxCategory) != 0) {
            [firstBody.node removeFromParent];
            _enemies--;
            [self _miss:secondBody.node];
        }
    }
}
これでゲーム画面ができました。 操作への反応や物理演算により、プレイできる状態になりました。
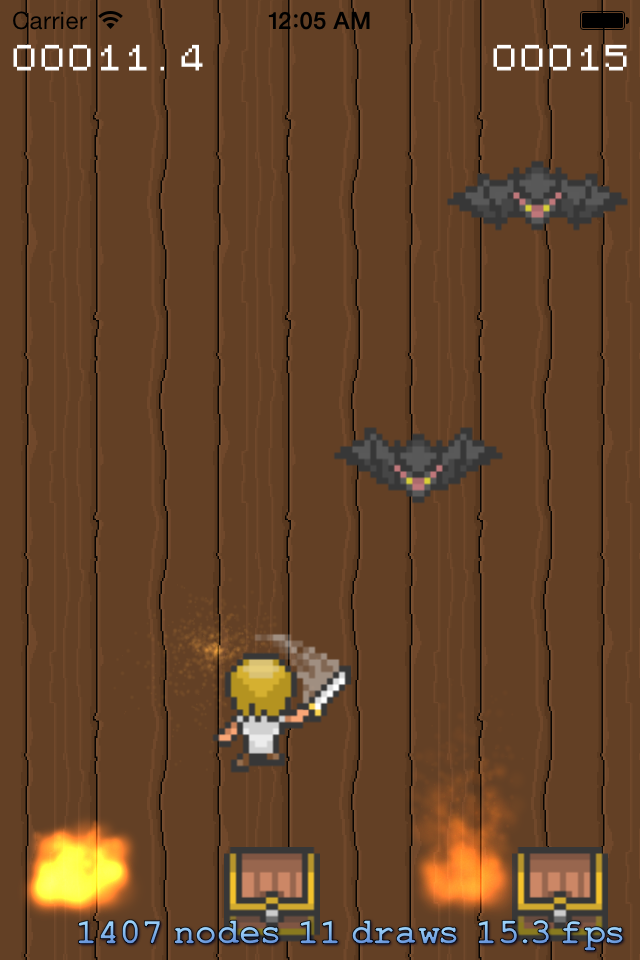
プレイできる
ゲームオーバー画面
最後にゲームオーバー画面です。 少し待った後、タイトル画面に戻しているだけの単純な実装です。
- (void)createSceneContents {
    SKLabelNode *titleLabel = [SKLabelNode labelNodeWithFontNamed:@"Mosamosa"];
    titleLabel.text = @"ゲームオーバー";
    titleLabel.position = CGPointMake(CGRectGetMidX(self.frame), CGRectGetMidY(self.frame));
    [self addChild:titleLabel];

    [self performSelector:@selector(_goTitle) withObject:Nil afterDelay:5.0f];
}

- (void)_goTitle {
    SJTitleScene *titleScene = [SJTitleScene sceneWithSize:self.size];
    SKTransition *transition = [SKTransition pushWithDirection:SKTransitionDirectionLeft duration:1.0f];
    [self.view presentScene:titleScene transition:transition];
}
このゲームにはクリアがないので、画面はこれで終わりです。
このようにSprite Kitを使うと、特別なツールの力を借りず、簡単にミニゲームを作ることができます。
-
このサイトのロゴにも利用。とても素敵なフォントです。もさもさフォント mosamosa font ↩
-
この時、敵と重なっていたら敵を破壊していますが、単なる操作感向上のためで、特に重要ではありません。 ↩
comments powered by Disqus
